


Featured Post
Back
Ways To Stay
View details for RV Sites 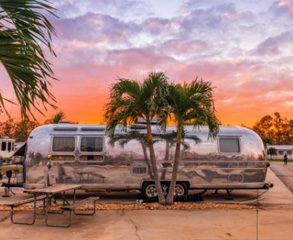
RV Sites
Enjoy full hookup RV sites that accommodate everything from pop-up campers to motorhomes.
View details for Lodging 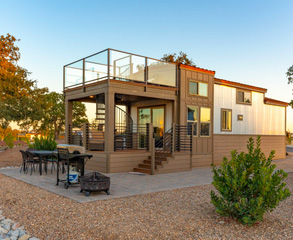
Lodging
Feel close to adventure without roughing it in traditional and unique vacation rentals and charming motels.
View details for Tent Camping 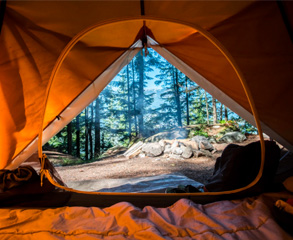
Tent Camping
Get back to basics. Sleep under the stars with our rustic and premium tent camping sites.
View details for Long-Term Stays 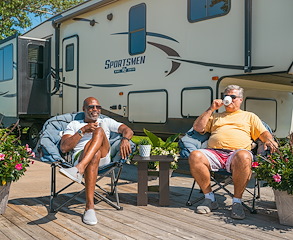
Long-Term Stays
Stay for just the summer or entire year. Leave your RV or purchase a vacation home for a season or lifetime.
Back
experiences
Explore our experiences
Find a Location
Recommended Resorts


Blog
Stories from the Sunny Side
Read our articles and blogs to plan your getaway, from things to do while RV camping to outdoor adventures, to how to buy a vacation home. Embrace your Sunnier Side at our scenic resorts across the US and Ontario, Canada, with Sun Outdoors.
- Popular tags
- tips
- camping-etiquette
- rv
- campsite
- campgrounds
- the-latest
- tips
- camping
- new-to-camping
- recipe
- soup
- fall
- winter
- camping-soup-recipe
- homemade-soup-for-camping
- easy-camping-meals
- checklist
- camping-gear
- tent
- cookware
- sleeping-bag
- backpack
- comfort
- how-to-hook-up-your-rv
- rv-hookup-tips
- rv-maintenance
- rv-set-up
- camping-setup
- camping-with-toddlers
- family-camping-tips
- preparation-for-camping
- leveling-rv
- stabilizing-rv
- rv-camping-tips
- maintenance
- air-conditioning
- check-up
- health
- healthy-meals
- travel
- vacation
- nutrition
- packing-tips
- packing-list
- top-reason-to-take-your-family-camping; family-camping; things-to-do; sun-outdoors
- rv-rentals
- renting-rv
- frequently-asked-questions
- buying-an-rv
- hydration
- summer-camping
- stay-cool-while-camping
- camping-tips
- grilled-banana-boat-recipe
- campfire
- treat
- snack
- bananas
- dessert
- easy-recipe
- s'mores
- national-smore-day
- fall-camping-tips
- fall-camping-gear
- sun-outdoors
- fall-camping
- cool-weather-camping-gear
- campfire-cooking
- meals
- food
- easy
- stuffed-peppers
- beef
- casserole
- rice
- florida
- golfing
- wedding
- honeymoon
- events
- groups
- ocala-orange-lake
- summer-vacation-season
- camping-adventures
- spring-and-summer-getaways
- resort-amenities
- cinco-day-may-recipes
- layer-dip-recipe
- taco-dip
- mental-health
- nature
- health-benefits-of-camping
- vanilla
- recipe
- pudding
- seafood
- restaurant
- key-largo
- conch-house
- snack-recipe
- grab-and-go-snacks
- easy-snacks
- scary-story
- campfire-tale
- ghost-story
- family-fun
- star-gazing
- constellations
- night-sky
- astrology
- astronomy
- campfire-tale
- snowbird-travel-tips
- eco-friendly
- green
- rving
- maine
- new-england
- saco-old-orchard-beach-koa
- the-latest
- wagon-wheel-campground-and-rv-
- wild-acres-rv-resort-and-campg
- healthy-rv-eating; healthy-eating-tip; tips; sun-outdoors; rv-meals; healthy-rv-meals
- fitness
- zumba
- yoga
- pickleballs
- stay-fit-while-camping
- work-camper-program
- sun-outdoors-careers
- employment
- jobs
- st-patricks-day-recipe
- shamrock-bites-recipe
- holiday-dessert
- groups
- group-events
- host-your-event
- weddings
- family-reunion
- company-retreat
- scout-camping
- outdoor-wedding
- corporate-team-building
- high-tech-camping-gear
- camping-gifts
- outdoor-enthusiast
- activities
- summer
- kids
- things-to-do
- outdoors
- outdoor-activities-for-kids
- family-camping
- unplugging-kids
- ghost-story
- scary-story
- winter-recipes
- slow-cooker-recipes; stew
- what-is-an-rv
- your-guide-to-different-types-of-rvs
- rv styles
- buy-or-rent-rv
- pickleball
- tennis
- activities
- outdoors-activities
- park-and-play-discounts
- long-term-stays
- annual-stays
- seasonal-stays
- container-gardening
- rv-garden
- gardening-tips
- new-england
- fall-foliage
- best-rv-resorts-for-fall-foliage
- old-orchard-beach
- saco
- maine
- mystic
- connecticut
- massachusetts
- dennis-port
- peters-pond
- wild-acres
- scenic-drive
- fall-activities
- resorts
- best-fall-camping
- massachusetts
- island
- cape-cod
- pennsylvania
- amish-country
- pennsylvania-dutch
- sun-retreats-lancaster-county
- michigan
- ohio
- wine-tour
- wineries
- vineyards
- fall-foliage
- mid-atlantic-region
- rv-resorts
- new-york
- north-carolina
- new-jersey
- virginia
- fall-vacation-ideas
- attractions
- ocean-city
- maryland
- globe-theater
- bark-beach
- horses-on-the-beach-history-trail
- main-street
- vacation-ideas
- fall-recipes
- campfire-cooking
- comfort-food
- salem
- witch-trials
- history
- halloween
- museums
- campers-haven-rv-resort
- peters-pond-rv-resort
- sandwich
- marco-naples-rv-resort
- sherkston-shores-rv-resort
- games
- outdoor-games
- petanque
- rocky-mountains
- pacific-coast
- utah
- california
- washington
- oregon
- family-dinner
- harvest-season
- harvest-season-fall-recipes
- how-to-winterize-your-home
- vacation-home
- winterizing-your-vacation-home
- winterizing-your-home
- potluck-recipes
- choosing-an-rv
- motorhome-vs-towable-rv
- buying-tips
- south
- sun-outdoors-sarasota
- foodie-restaurants
- restaurants
- sarasota
- sarasota-dining
- sarasota-food-guide
- best-restaurants-in-sarasota
- camping-trip
- camping-activities
- outdoor-fun
- whale-watch
- rv-resort
- dewinterizing
- rv-system-check
- rv-water-system
- rv-cooking
- camping-meals
- recipes
- blazing-star-rv-resort
- fiesta-san-antonio
- southwest
- texas
- sun-retreats
- travelers-world-rv-resort
- campfires
- kindling
- diy-kindling
- campfire-tips
- campfire
- cooking
- cooking-equipment
- cooking-outdoors
- buy-a-vacation-home
- low-maintenance
- no-reservations
- outdoor-lifestyle
- margarita
- mint-julep
- mojito
- summer-cocktails
- drink-recipes
- gift-ideas
- mothers-day
- mothers-day-gift-guide
- camping-breakfasts
- fort-mackinac
- grand-hotel
- mackinac-bridge
- mackinac-island
- mackinac-island-state-park
- midwest
- petoskey-bay-harbor
- jellystone-petoskey
- lake-ontario
- biking
- sun-retreats-hay-bay
- ontario-canada
- sun-retreats-homosassa-river
- sun-retreats-crystal-river
- red-oaks-sun-rv-communities
- crystal-river-florida
- bay-scallop-season
- florida-scallop-season
- gulf-coast-resorts
- fishing-in-ontario
- best-fishing-locations-ontario-canada
- where-to-fish-in-ontario
- jellystone-park-at-birchwood-a
- jellystone-water-parks
- mid-atlantic
- water-park
- yogi-bears-water-zone
- best-beaches-ontario-canada
- ontario-beach-resorts
- best-beaches-in-ontario
- beach-packing-list
- family-friendly-beaches
- beach-activities
- tips-for-bug-free-rv
- pest-control
- campfire-songs
- sing-along
- best-campfire-songs
- sing-along-songs
- campfire-classics
- aerial-adventures
- zip-line
- high-ropes-course
- recipes
- campfire-cooking-tips
- bbq-tips
- camping-recipes
- sun-outdoors
- canada
- dog-beaches
- ontario
- sherkston-shores
- sun-retreats-sherkston-shores
- shipwreck-playground
- water-park-activities
- ontaro-summer-getaway
- ontario-canada
- water-parks-in-ontario
- summer-fun
- family-attractions
- military-camping-discount
- sun-military-discount
- sun-news
- savings
- offer
- best-rv-parks
- readers-digest
- camping-with-pets
- pet-friendly
- rving-with-dogs
- tips-for-rving-with-dog
- amusement-parks
- lancaster-county
- pennsylvania
- hersheypark
- dutch-wonderland
- dorney-park
- dutch-country
- energy-balls
- energy-bites
- no-bake
- healthy
- camping-snacks
- nut-free
- mobile-apps
- ios
- android
- campfire-recipes
- canada
- hiking
- trails
- niagara-falls
- niagara-falls-breweries
- sherkston-shores-beach-resort-
- the-true-north
- fall-camping-activities
- things-to-do-fall-camping
- campfire-cooking-with-kids
- cooking-with-kids
- fall-activities
- scenic-drives
- chocolate-caramel-smore
- elvis-smore
- gourmet-smores-recipes
- grasshopper-smore
- lemon-meringue-pie-smore
- peanut-butter-smore
- smores
- samoa-smore
- rent-rv
- rv-rentals
- rv-lifestyle
- renting-an-rv
- traveling-with-a-group
- camping-experience
- save-money-on-rv-rentals
- back-to-school-tips
- back-to-school-tips-for-parents
- camping-hacks
- niagara-falls-wineries
- wine-tastings
- vineyard
- niagara-wineries
- wine-country
- winery-tours
- how-to-pack-a-cooler
- how-to-pack-your-cooler
- packing-a-cooler
- steps-on-how-to-pack-your-cool
- babyproofing
- babyproof-your-rv
- babyproofing-tips
- how-to-babyproof-your-rv
- pumpkin-patches
- harvest-festivals
- scenic-trails
- rv-checklist
- rv-checklist-for-snowbirds
- snowbirds
- rv-jargon
- rv-slang-terms
- 49er-village-rv-resort
- cava-robles-rv-resort
- indian-wells-rv-resort
- vines-rv-resort
- west
- wine-country-rv-resort
- fall-activites
- big-bear-lake
- sugar-pine-point-state-park
- easy-halloween-recipes
- spooky-halloween-treats
- halloween-party-food
- coffee
- coffee-drinks
- types-of-coffee-drinks
- amazing-corn-mazes
- corn-maze
- florida
- regions
- wisconsin
- charlevoix-apple-fest
- autumn
- midwest-fall-foliage
- petoskey
- halloween
- halloween-rv-decorating
- halloween-rv-decorations
- halloween-rv-site
- halloween-decorating-ideas
- rv-halloween-decorations
- spooky-rv-decor
- great-smokey-mountains-national-park
- south-carolina
- richmond
- rv-winter-storage
- rv-winter-storage-hacks
- halloween-safety-tips
- trick-or-treating
- guide-to-winterizing-your-rv
- how-to-winterize-your-rv
- winterize-your-rv
- winterizing-your-rv
- safe-rv-driving-tips
- winter-rv-driving-tips
- holiday-rv-driving-tips
- rv-driving-tips
- snowbird
- caramel-corn
- gingerbread-cookies
- holiday-sweets
- hot-chocolate
- peppermint-bark
- holiday-sweet-treats; holiday-sweets; holiday-treats
- christmas-sweets; christmas-treats
- christmas-dessert-recipes
- easy-holiday-baking
- dairy-free-recipe
- how-to-cook-a-turkey
- how-to-cook-a-turkey-in-your-r
- rv-cooking
- thanksgiving
- thanksgiving-turkey
- golf-cart-safety
- holidays
- cookies
- holiday-recipes
- bike-trails
- bbq
- barbeque
- best-bbq-in-texas
- texas-bbq-joints
- park-model
- snowbird-planning-tips
- retirement-living
- new-years-resolution-ideas
- new-year's
- new-year's-resolutions
- rv-winter-driving-kit
- tips; how-to-create-rv-winter-driving-kit
- sun-outdoors-paso-robles
- exercise
- fitness
- sun-outdoors-coos-bay
- stay-fit-at-sun-outdoors; sun-outdoors
- fitness-centers
- exercise-classes
- excercise-while-traveling
- groundhog-day
- february
- candlemas
- texas
- road-trip
- dallas-fort-worth
- san-antonio
- cooking
- healthy-recipes
- black-bean-soup
- healthy-rv-recipes
- easy-rv-meals
- whole-wheat-pancakes
- hummus0and-avocado-wrap
- destinations
- great-lakes
- football
- game-day-snacks
- bbq-meatballs
- french-onion-dip
- game-day-recipes
- super-bowl-snacks
- buffalo-wings
- apps
- appetizers
- best-places-to-retire
- naples
- retirement
- senior-living
- how-to-plan-a-camping-trip
- vacation-planning. resorts
- saint-patricks-day
- st-patricks-day
- irish-holiday
- ireland
- four-leaf-clover
- luck-of-the-irish
- colorado
- granby-colorado
- river-run-rv-resort
- signature-sun-rv-resort
- rocky-mountains
- adirondack-gateway-rv-resort
- resort-features
- adirondack-mountains
- rv-camping
- what-to-pack
- camping-prep
- sun-news
- sun-unity
- earth-day
- celebrate-earth-day
- april-22
- sustainability
- environmental-impact
- community-clean-up
- jellystone-park-at-larkspur
- jellystone-park-of-lazy-river
- jellystone-park-of-luray
- jellystone-park-of-maryland
- jellystone-park-of-quarryville
- jellystone-park-of-western-new
- jellystone-park-at-birchwood
- yogi-bear
- canadian-border
- us-canada-border
- travel-tip
- border-crossing
- united-states-to-canada
- easter
- easter-recipes
- spring-recipes
- sweet-treats
- side-dishes
- frontier-town-rv-resort
- campground
- vacation-rentals
- theme-park
- campfire-recipes
- dutch-oven-apple-cobbler
- chicken-alfredo
- memorial-day
- memorial-day-recipes
- grilling
- summer-cookout
- grilled-chicken
- sunburn-relief
- sunburn
- sunburn-remedies
- natural-solutions
- how-to-heal-sunburn
- fathers-day
- fathers-day-gift-ideas
- gifts-for-the-camping-dad
- how-to-pack-an-rv
- how-to-pack-your-rv
- list-of-things-to-pack-in-your
- packing-an-rv
- cookout
- national-parks
- canada-day
- fort-tatham-rv-resort-and-campground
- great-smoky-mountains-national-park
- nantahala
- 4th-of-july
- fourth-of-july
- independence-day
- sunfest
- blueberry-picking
- season
- region
- cottages
- vacation-homes
- buy-a-vacation-house
- niagara
- farms
- creamsicle
- resorts
- sun-outdoors-pigeon-force
- tennessee
- smoky-mountains
- camground-amenities
- rving-with-pets
- tips-for-rving-with-pets
- traveling-with-pets
- campfire-foil-packet-recipes
- campfire-foil-packets
- foil-packet-recipes
- foil-packets
- fall-crafts
- kids-crafts
- lobster
- arches-national-park
- moab
- beer
- breweries
- colorado
- hidden-ridge-rv-resort
- indian-creek-rv-camping-resort
- petoskey-rv-resort
- wine
- camping-costumes
- halloween-costumes
- halloween-camping-costumes
- arizona
- sun-retreats-ocala-orange-lake
- northwest
- palm-creek-resort-and-residences
- golf
- golfing-getaway
- golf-resorts
- fall-camping
- apples
- apple-recipes
- fishing
- chesapeake-bay
- holiday-recipes
- treetops
- rv-community
- dallas-cowboys
- at&t-stadium
- crystal-river
- kayaking
- gulf-coast
- jellystone-park-at-birchwood-a
- sleepy-hollow-ny
- california
- winter-getaway
- hiking
- how-to-cook-a-thanksgiving-turkey
- unique-turkey-recipes
- christmas
- holiday
- orlando-florida
- palm-springs-california
- san-antonio-texas
- spring-break
- orlando-attractions
- san-antonio-activities
- palm-springs-resorts
- sweets
- valentines-day
- paso-robles
- rv-decorating-ideas
- christmas
- holidays
- holiday decor
- christmas decor
- holiday-sweets
- holiday-baking
- desserts
- destinations
- leaf-verde-rv-resort
- lost-dutchman-mh-and-rv-resort
- palm-creek-golf-and-rv-resort
- sticking-to-your-new-years-resolution
- new-years-tips
- snacks
- game-day
- jacksonville
- pecan-park
- blue-star-rv-resort
- wildflowers
- lost-dutchman
- saguaro-national-park
- arboretum
- long-term-guests
- long-term-stay-program
- rv-longer
- rv-longer-program
- snowbirds
- travel-tips
- working-from-home
- working-remotely
- remote-work
- work-from-home
- great-smoky-mountains-national
- sun-outdoors-sevierville-pigeo
- pigeon-forge
- board-games
- things-to-do
- classic-board-games
- new-board-games
- dice-games
- card-games
- interactive-online-games
- game-night-ideas
- easy-recipes
- chicken-tikka-masala
- burrito-bowls
- beef-and-broccoli
- rv-meals
- easter-crafts
- kids-activities
- spring-crafts
- craft-stick-carrots
- marble-easter-eggs
- bunny-baskets
- mason-jar-crafts
- festive-decorations
- spring-cleaning
- diy-spring-cleaning-ideas
- clean-home
- yard-prep
- garden-planning
- window-cleaning
- decluttering
- rv-organization
- gardening
- spring
- rving-with-pets
- smoothies
- amish-country
- lake-in-wood-rv-resort
- health
- family-vacation
- vacation-planning
- austin-lone-star-rv-resort
- blazing-star-rv-resort
- hill-country-cottage-and-rv-re
- la-hacienda-rv-resort
- texas-hill-country
- lake-travis
- day-trip
- door-county
- fond-du-lac-east-kettle-moraine
- philadelphia-day-trips
- home-decor
- home-decorating
- coffee
- niagara-region
- infographic
- vegan-recipes
- hershey
- things-to-do-near-hershey
- fort-tatham-rv-resort-and-camp
- oceanside-rv-resort-campground
- the-sands-rv-and-golf-resort
- waterfalls
- resort
- sun-outdoors-pigeon-forge
- rv-maintenance
- family-vacation
- beach
- safari
- at-home-activities
- infographic
- travel-with-kids
- breweries
- hiking-etiquette
- trail-etiquette
- water-parks
- sun-outdoors-resorts
- myrtle-beach
- sherkston-ontario
- new-oleans
- frontier-town
- sherkston-shores-beach-resort
- big-timber-lake-rv-and-camping
- cape-may
- jersey-shore
- long-beach-rv-resort
- alabama
- gulf-shores
- pandion-ridge-rv-resort
- shopping
- outlet-mall
- orange-beach
- sun-outdoors-lancaster-county
- pennsylvania-foods
- philly-cheesesteaks
- hidn-pines-rv-resort
- wagon-wheel-rv-resort-campgrou
- wild-acres-rv-resort-and-campground
- vacation-rental
- biking
- bike-safety
- illinois
- petoskey-koa
- silver-creek-rv-resort
- indiana
- lake-rudolph
- louisiana
- miniature-golf
- mini-golf
- kayaking
- kayaking-tips
- kayaking-safety
- burger-recipes
- labor-day
- oregon-coast
- sun-outdoors-myrtle-beach
- sun-outdoors-rocky-mountains
- canyonlands-national-park
- horseback-riding
- adirondack-gateway
- geneva-on-the-lake
- apple-picking
- amish
- gettysburg
- hurricane-preparedness
- blue-mountains
- hiking-tips
- beginnner-hiking
- trail-mix
- fall-color
- fall-foilage
- staycation ideas
- moab-valley
- salt-lake-city
- canyonlands-gateway
- arches-gateway
- garden-city
- rv resort
- sun-retreats-old-orchard-beach
- maine-campground
- saco-old-orchard-beach
- family-friendly-halloween-movies
- spooky-season
- halloween-classics
- chili
- pumpkin-seeds
- sweet
- savory
- veterans-day
- military-offer
- specials
- halloween-menu
- easy-halloween-recipes
- spooky-snacks
- halloween-buddies
- witch-finger-breadsticks
- hot-dog-mummies
- ghost-cookies
- halloween-appetizers
- halloween-desserts
- full-time-rv
- remote-job
- florida-vacation-homes
- home-sales
- second-home
- stuffing-recipes
- thanksgiving-stuffing
- best-thanksgiving-sides
- holiday-table
- decorating-tips
- festive-table-decor
- holiday-centerpiece
- mood-lighting
- napkin-folding
- table-settings
- holiday-decorations
- crafts
- diy
- gift-ideas
- diy-christmas-gifts
- christmas-gifts-for-crafty-campers
- homemade-holiday-crafts
- budget-friendly-holiday-gifts
- vitamins
- healthy-foods
- immunity-with-whole-foods
- eat-healthy
- club-naples-rv-resort
- dunedin-rv-resort
- hidden-river-rv-resort
- kissimmee-south-mh-rv-resort
- lake-san-marino-rv-resort
- mill-creek-rv-resort
- naples-rv-resort
- palm-creek-resort-residences
- rainbow-village-of-largo
- reunion-lake-rv-resort
- spanish-main-mh-and-rv-resort
- hot-chocolate
- hot-cocoa-recipes
- hot-chocolate-recipes
- stocking-stuffers
- camping
- snow-activities
- exercise
- home-fitness
- equipment
- snowbird-planning-tips
- types-of-snowbirds
- detox
- hydration
- arches-national-park
- stargazing
- sun-outdoors-arches-gateway
- sun-outdoors-canyonlands-gateway
- sun-outdoors-moab-downtown
- sun-outdoors-north-moab
- dark-sky
- dark-skies
- dark-sky-parks; star-gazing
- grow-your-own-vegetables
- indoor-gardens
- savory-pies
- taco-pie
- chicken-pot-pie
- read
- books
- austin-lone-star-rv-resort
- sandy-lake-rv-resort
- treetops-rv-resort
- lone-star-state
- maple-syrup
- winter-park
- skiing
- snowshoeing
- snowbird
- zephyrhills
- rv-living
- bluebonnet
- strawberries
- mid-atlantic
- shenandoah
- shenandoah-national-park
- fort-myers
- groves-rv-resort
- indian-creek-rv-resort-and-mh-
- siesta-bay-rv-resort
- woodsmoke-camping-resort
- fort-myers-beach
- tampa
- clearwater
- dunedin
- spring-camping-essentials
- spring-camping-tips
- spring-camping
- outdoor-adventure
- buckeye
- zoo
- park
- st-patrick's-day-recipes
- irish-food
- traditional-irish-dishes
- el-capitan-canyon
- ocean-mesa-rv-resort
- santa-barbara
- glamping
- delaware
- leisure-point-resort
- rehoboth-beach
- sea-air-village
- packages
- rv-life
- full-time-rv
- deliveries
- amazon
- mail-forwarding
- nomadic-rv-lifestyle
- daytona-beach
- florida-keys
- florida-road-trip
- florida-vacation
- lakeland
- orlando
- the-keys
- jacksonville-zoo
- walt-disney-world
- bear-lake
- blue-water-beach-resort
- alabama
- mobile-alabama
- country-squire-mh-and-rv-resor
- daytona-beach-rv-resort
- grand-lake-rv-golf-resort
- homosassa-river-rv-resort
- manatees
- orange-city-rv-resort
- rock-crusher-canyon-rv-resort
- national-park-week
- national-park-foundation
- sun-outdoors-partnership
- visit-national-parks
- virtual-tours
- aerial-adventure-park
- high ropes
- zipline
- zip-line-courses
- moab
- rafting
- national parks
- gwynns-island
- jellystone-park-at-natural-bridge
- new-point
- sand-dunes
- dunes
- lake-michigan
- sun-retreats-birch-bay
- west-coast-the-rockies
- cape-cod
- cape-cod-rv-resort
- senior living
- 55+-senior-living
- casa-grande-retirement-community
- active-adult-resort
- sun-outdoors; things-to-do
- mothers-day-activities
- camping-ideas-mothers-day
- outdoor-brunch-ideas
- strawberry-picking
- tips-on-strawberry-picking
- cape-may
- cape-may-naval-attractions
- sun-outdoors-cape-may
- naval-attractions
- military
- armed-forces
- attractions
- naval-history
- golf-courses-in-gulf-shores
- gulf-shores-golf
- golfing-in-alabama
- gulf-state-park
- fruit-slush
- lake-erie
- maine-attractions
- arcadia-national-park
- camping; rv; decor
- rotisserie-chicken
- fathers-day
- gift-cards
- corn
- corn-on-the-cob
- summer-side-dish
- how-to-cook-corn-on-the-cob
- grilled-corn
- big-timber-lake-rv-and-camping
- seashore-campsites-and-rv-reso
- avalon
- whale-watching
- seashore
- ocean-city-gateway
- fort-whaley
- rv-camping-in-ocean-city
- ocean-city-attractions
- juneteenth
- outdoor-afro
- boston
- campers-haven
- marthas-vineyard
- house-rentals
- hammock. national-hammock-day
- buying-a-hammock
- charter-fishing
- atlantic-city
- shady-pines
- jellystone-park
- wildwood
- long-beach-island
- 4th-of-july-campsite-decorations
- 4th-of-july-campsite-decor; 4th-of-july-decor
- 4th-of-july-decorations
- rv-essentials-checklist
- rv-emergency-kit
- first-aid
- tents
- buy-a-tent
- types-of-tents
- amusement-parks
- hot-dogs
- regional-food
- national-hot-dog-day
- daquiris
- alcoholic
- cocktails
- road-trip
- pelican-rv-resort-and-marina
- marathon
- amusement-park
- roller-coaster
- accessible
- wheelchair
- petoskey-michigan
- shopping
- area-attractions
- checklist
- tent-camping-checklist
- camping-essentials
- campsite-kitchen
- tourist-attractions
- rv
- types-of-rvs
- recreational-vehicle
- buying-rv
- nantahala
- blue-ridge-mountains
- rock-river
- coast
- san-diego
- chula-vista
- venice-beach
- san-luis-obispo
- big-sur
- orange-beach
- swimming
- fishing
- angler
- lake-okeechobee
- best-fishing-spots
- fall-fishing-spots
- anglers
- new-jersey
- cape-may-wildwood
- best-golf-courses-in-cape-may
- cape-may-golfing
- weekend-getaway-tips
- statue-of-liberty
- philadelphia
- disneyland
- dollywood
- waco
- new-ywork-city
- labor-day-activities
- game-day-recipes
- football-snacks
- fajitas
- vegetarian
- iowa
- kentucky
- gas
- save-money
- delaware
- ferry
- hiking-trails
- california-hiking
- themed-events
- family-friendly
- spooktaculars
- off-season
- upstate-new-york
- buffalo
- rochester
- albany
- letchworth-state-park
- day-trips
- atlantic-city
- resort-amenities
- miniature-golf-courses
- courses
- mini-bowling-alley
- pickleball
- water-parks
- vacation-amenities
- halloween; pumpkin-carving-tips; jack-o-lantern
- halloween-decorations
- seaport
- hartford
- mohegan-sun
- vacation-rentals
- lancaster-country
- garden-city-utah
- hotel
- motel
- rustic-camping
- lake-rudolph
- santa-claus
- holiday-world
- festivals
- grand-canyon
- fireworks
- july-4th
- fourth-of-july-fireworks
- north-america
- independence-day-celebrations
- fireworks-events
- 4th-of-july-festivities
- drive-in-theaters
- movies
- aquariums
- lighthouses
- sunset
- best-sunsets
- birds
- birding-hotspots
- roller-coaster
- rv-living
- extended-stays
- full-time-living-in-florida
- florida-site-lock-program
- tax-benefits
- colorado; activities; skiing; camping; outdoor-adventure
- things-to-do-in-colorado
- arapahoe-basin
- mesa-verde-national-park
- no-membership-fees
- rving-save-gas
- save-gas-money
- uv-damage
- rv-uv-protection
- rv-cover
- ultraviolet protection
- memorial-day-activities
- memorial-day-weekend
- resort amenities
- resort activities
- ways-to-get-around-a-campground
- golf-cart
- bike
- bicycle
- golf-carts
- scooter
- scooters
- electric-bike
- e-bike
- michigan-rv-resorts
- lake michigan
- ludington
- silver-lake
- grand-rapids
- detroit
- metro-detroit
- americas-third-coast
- third-coast
- firework-alternatives
- 4th-of-july
- patriotic crafts
- bear-lake
- sun-outdoors-garden-city
- sun-outdoors-salt-lake-city
- summer-hydration
- hydrating-fruits-and-vegetables
- natural-summer-hydration
- high-water-content-foods
- new-jersey-road-trip
- how-to-prevent-bug-bites-while-camping
- bug-bite-prevention
- treating-bug-bites
- bug-stings
- mosquitos
- ticks
- labor-day-weekend-meal-ideas
- labor-day-weekend
- labor-less-meal-prep
- fall-crafts
- natural-fall-crafts
- fall-desserts
- pumpkin-spice
- pears
- fall-sweets
- voting
- election-day
- how-to-vote-while-on-vacation
- absentee-voting
- thanksgiving-side-dishes
- sauerkraut
- creamed-onions
- butter-beans
- wild-rice-casserole
- corn-spoon-bread
- frogs-eye-salad
- empanadas
- mushroom-gravy
- acorn-squash
- sun-outdoors-gift-card
- gift-card
- purchase-gift-cards
- the-dyrt-magazine-awards
- sun-outdoors-cape-charles
- sun-outdoors-lake-rudolph
- 2022-best-places-to-camp
- wine-tasting-regions
- california-wine-country-oregon-wine-country-midwest-wine-region
- new-york-wine-trail
- ontario-canada-wine-region
- canada-niagara-wine-region
- county
- paso-robles-wine-region
- napa-valley
- california-wine
- midwest-wineries
- oregon-wine-country
- myrtle-beach-fall
- february-events-festivals-florida
- 2025-dates
- music
- state-fair
- spring-training
- upstate-new york
- boating
- lake-ontario
- thousand-0islands
- 1000 islands
- historic-island-lodging
- vacation rentals
- myrtle-beach
- vacation rentals
- rv-sites
- family-friendly-amenities
- November 2024 (1)
- October 2024 (5)
- September 2024 (7)
- August 2024 (5)
- June 2024 (4)
- May 2024 (6)
- April 2024 (1)
- March 2024 (5)
- February 2024 (1)
- January 2024 (2)
- December 2023 (2)
- November 2023 (3)
- October 2023 (2)
- September 2023 (2)
- August 2023 (2)
- July 2023 (1)
- June 2023 (3)
- May 2023 (1)
- April 2023 (3)
- March 2023 (2)
- February 2023 (1)
- January 2023 (2)
- December 2022 (4)
- November 2022 (5)
- October 2022 (4)
- September 2022 (4)
- August 2022 (1)
- July 2022 (4)
- June 2022 (3)
- May 2022 (3)
- April 2022 (1)
- March 2022 (2)
- February 2022 (1)
- November 2021 (2)
- October 2021 (5)
- September 2021 (10)
- August 2021 (10)
- July 2021 (10)
- June 2021 (11)
- May 2021 (8)
- April 2021 (6)
- March 2021 (10)
- February 2021 (7)
- January 2021 (6)
- December 2020 (7)
- November 2020 (7)
- October 2020 (9)
- September 2020 (10)
- August 2020 (4)
- July 2020 (11)
- June 2020 (9)
- May 2020 (7)
- April 2020 (8)
- March 2020 (6)
- February 2020 (4)
- January 2020 (3)
- December 2019 (1)
- November 2019 (3)
- October 2019 (7)
- September 2019 (5)
- August 2019 (4)
- July 2019 (4)
- June 2019 (9)
- May 2019 (1)
- April 2019 (4)
- March 2019 (3)
- February 2019 (3)
- January 2019 (3)
- December 2018 (3)
- November 2018 (3)
- October 2018 (6)
- September 2018 (3)
- August 2018 (9)
- July 2018 (8)
- June 2018 (7)
- May 2018 (5)
- April 2018 (1)
- March 2018 (5)
- January 2018 (1)
- December 2017 (1)
- October 2017 (3)
- September 2017 (2)
- August 2017 (5)
- July 2017 (1)
- June 2017 (1)
- May 2017 (1)
- March 2017 (1)
- February 2017 (1)
- October 2016 (2)
- June 2016 (2)
- March 2016 (1)
- February 2016 (1)
- January 2016 (1)
- October 2015 (1)
- August 2015 (1)
- July 2015 (1)
- June 2015 (2)
- April 2015 (1)
- March 2015 (1)
- October 2014 (1)
- August 2014 (1)
- October 2013 (1)
- August 2013 (1)
- July 2013 (1)

Oct 25, 2024
Snowbird RV Travel Tips on Migrating South for the Winter
Get ready for your winter RV adventure! Check out essential tips for vehicle inspections, packing, and winterizing your home to ensure a smooth journey to warmer destinations.
Oct 08, 2024
What to Know Before You Rent an RV
Ready to hit the road? Renting an RV offers flexibility and fun without the commitment of ownership. Learn about different RV types, driving tips, costs, and more to make your next camping adventure unforgettable!
Oct 08, 2024
A Warm Welcome to Southern Leisure
We are thrilled to share that Southern Leisure RV Resort is joining the Sun RV Resorts family. This active 55+ outdoor destination is in the town of Chiefland, a hub for exploring northwestern Florida.
Oct 07, 2024
Beat the Heat While RV Camping & Check that AC
Get your RV's air conditioner ready for summer with these six maintenance tips! Keep cool on your next camping trip by ensuring optimal performance and efficiency.
Oct 03, 2024
Campfire Cooking Tips and Tricks
Elevate your camping meals with three essential campfire cooking methods! Learn how to grill meats, cook veggies in foil, and bake desserts in a Dutch oven. Enjoy a fun and flavorful outdoor dining experience!
Sep 28, 2024
Welcome to Sun Outdoors Myrtle Beach
Experience the ultimate outdoor escape at Sun Outdoors Myrtle Beach! Enjoy spacious RV sites, charming cottages, and top-notch amenities, all nestled in South Carolina’s scenic low country. From pools and a water park to pickleball and dog parks, there's fun for everyone. Book your adventure today!
Sep 27, 2024
5 Amazing Corn Mazes to Visit This Fall - 2024 Updates
Get ready for fall fun with our top 5 corn mazes to visit! Explore exciting themes, family activities, and picturesque farms that promise a memorable autumn adventure. Whether you're navigating twists and turns or enjoying pumpkin picking, these mazes are perfect for creating lasting memories with friends and family.
Sep 26, 2024
Vacation Rentals vs. Hotels: Which is Right for You?
Deciding between vacation rentals and hotels? Discover the key differences to help you choose the perfect accommodation for your trip. From the extra space and local charm of vacation rentals to the convenience and consistency of hotels, we’ll guide you through the pros and cons of each option. Make your next getaway memorable with the right choice!
Sep 16, 2024
Camping with a Toddler
Planning a family camping trip with toddlers? Embrace the adventure with smart preparation! From creating a makeshift potty tent to packing fun distractions, discover essential tips to ensure a memorable and stress-free experience in the great outdoors. Remember, the key is to keep it simple and focus on enjoying quality time together!
Sep 14, 2024
New England Fall Foliage Tours
Explore New England's breathtaking fall foliage! Enjoy scenic drives, invigorating hikes, and relaxing river adventures to fully embrace the autumn season.
Leaving Site
You are about to enter our customer portal. The portal allows current long-term (seasonal or annual) guests to check balances, make payments, and much more.
If you are not a current long-term guest, please close this window to book an online reservation or a long-term stay.